Applications & Web: MS-DOS: Map Editor
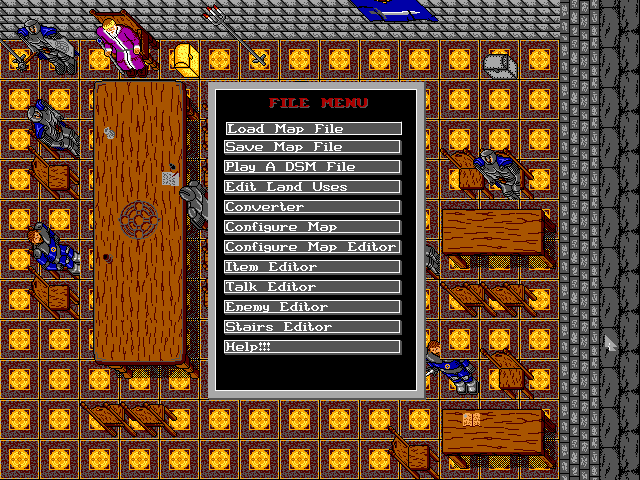
The Map Editor is the largest application I ever wrote for MS-DOS and was used to edit maps for Stone Bringer, a massive role playing game I developed in the 90s. It features a wide array of tools to create maps and design everything in the game, using the graphics created in Master GFX 16 which I also wrote. Working with a game artist we created dozens of towns, caves, dungeons as well as the main map. Everything in the game could be edited from here including sound, animation, 3D effects, screen palettes, enemies, weapons and game characters.
My Role: Developer and concept | Languages Used: Turbo Pascal, assembly
Screenshots
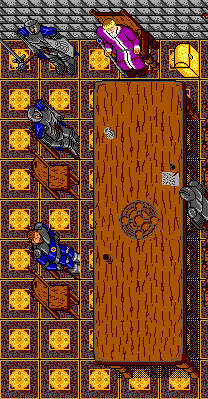
Editing the main map in the Map Editor. Placing tiles in the map consists of using the mouse to move the cursor (a flashing square) and clicking on where to place it.

Selecting a tile in the Map Editor. With over 3,000 tiles in the library it was important to organize graphics into catagories so they are easy to find.
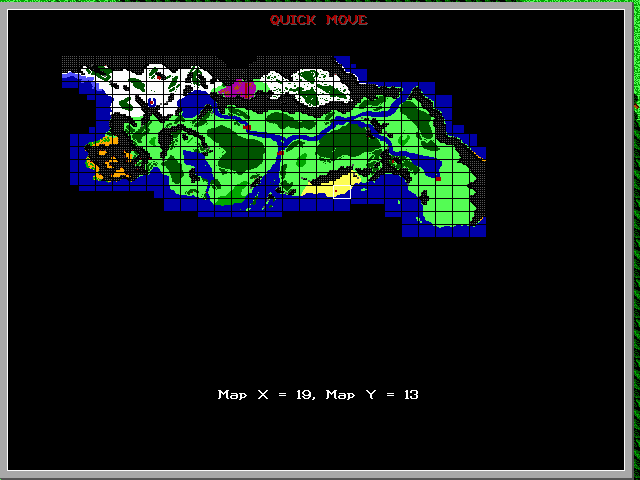
Viewing the main map zoomed out, also called the "Quick Move" tool. Since a map can be dozens of screens wide and high, using the Quick Move tool is often the easiest way to navigate while editing maps. The Quick Move tool brakes the map into rectangles which are the size of one screen, so you can get an idea of how big the map is and move around quickly using the mouse.
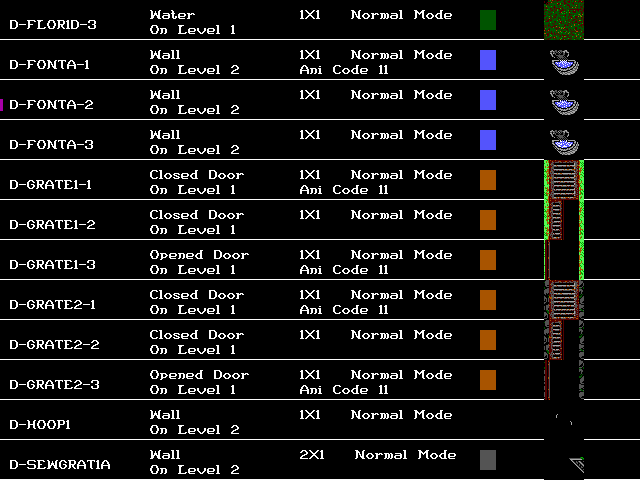
Scrolling through the "land uses" for each tile in the Map Editor. The land uses of a tile defined how it a was used in the game - i.e. whether it was a wall or floor, how it should be animated, or whether it appears on top of other objects.
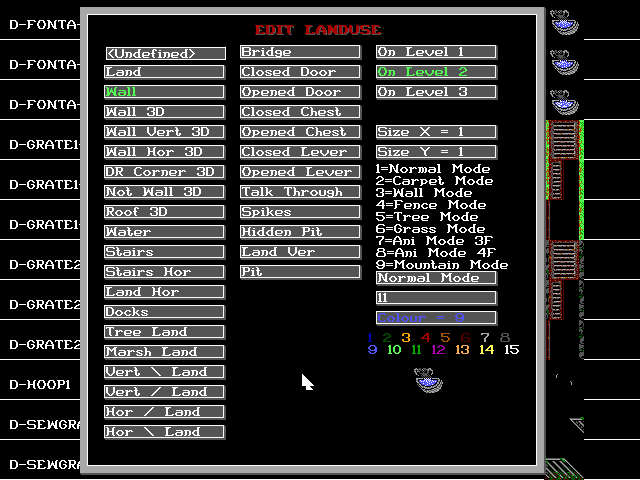
Editing the land use for one tile in the Map Editor. The first two columns are a list of different uses that could be assigned to a tile - whether it be a wall, floor, water, trap, stairs or an object that reacted to your character such as a chest or a door. The right column defines which layer a tile should appear on (Stone Bringer supports up to 3 layers of graphics on each map), how large a tile is, how to animate it and what colour it should be in the zoomed out map. For tiles that are part of a larger set of tiles, you can define a "mode" for each tile so the Map Editor can automatically figure out which tile to place. An example of this is shown in the next screen.
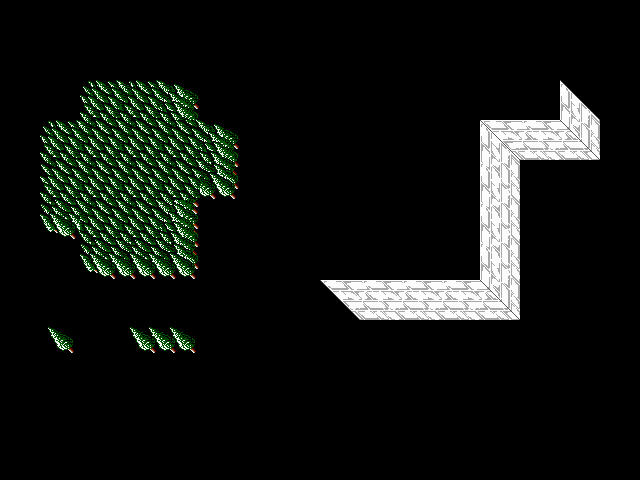
Drawing tiles that are part of a set in the Map Editor. By defining the properties for each tile in the landuse editor, the Map Editor automatically figures out which layer to draw a tile on, and which tile to use for top, bottom or corner of an object. The trees in this map were drawn by selecting a tree only once, and clicking all over the map with the mouse. The Map Editor knows which tile to draw based on the land use, so the game designer doesn't waste time selecting each tile individually. The walls were also drawn by selecting a tile only once, and letting the Map Editor figure out where corners or straight pieces should be drawn as the user clicks on each square.

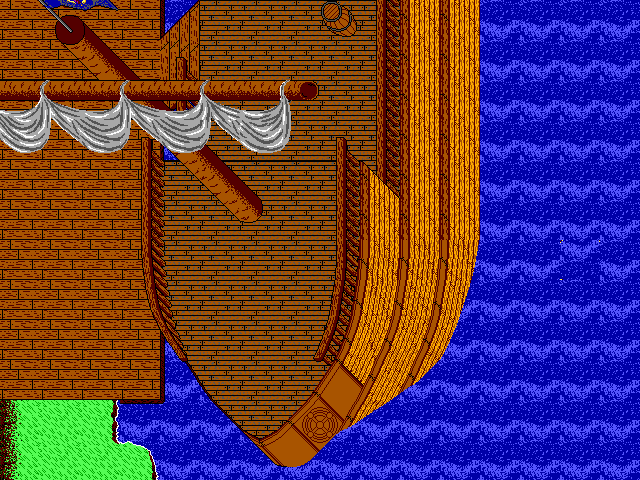
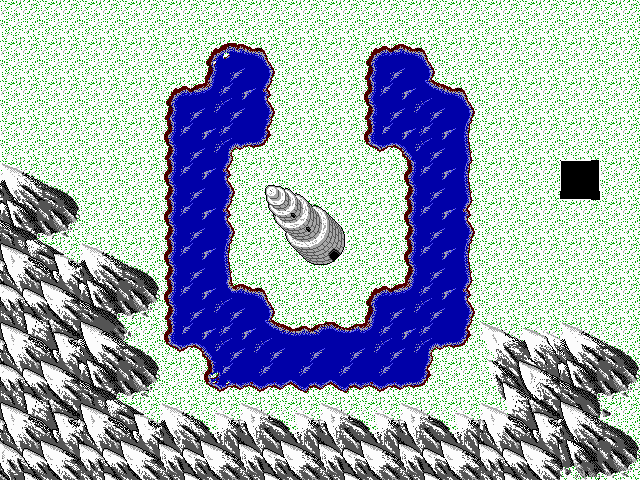
The same ship as the previous screen shot, except viewed in the night mode. The Map Editor allowed defining how long a day or night should be for each map, and toggling between both modes to see what a map looked like at night. A cave could be defined as always being dark, while an indoor room could be defined as always being bright. Time could go by faster while travelling from town to town, while days would go by slowly while walking within a town.
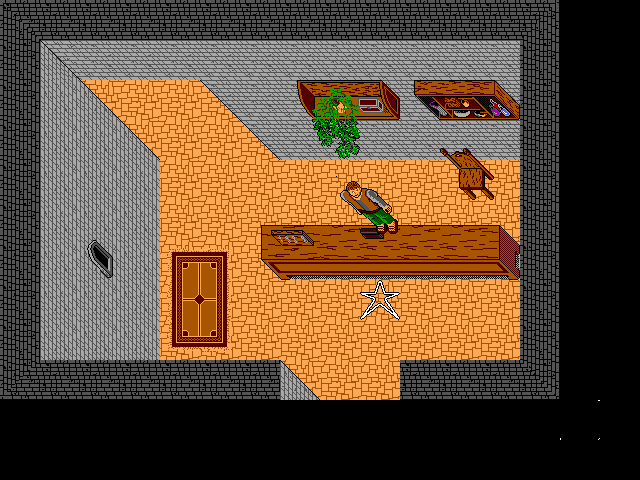
Adding a character in a room created in the Map Editor. For editing purposes the character's feet appear incorrectly over the table in the Map Editor, however the actual game will properly place characters behind 3D objects by using the information entered in the land use editor. The white star is the default location to load your character when entering a map.
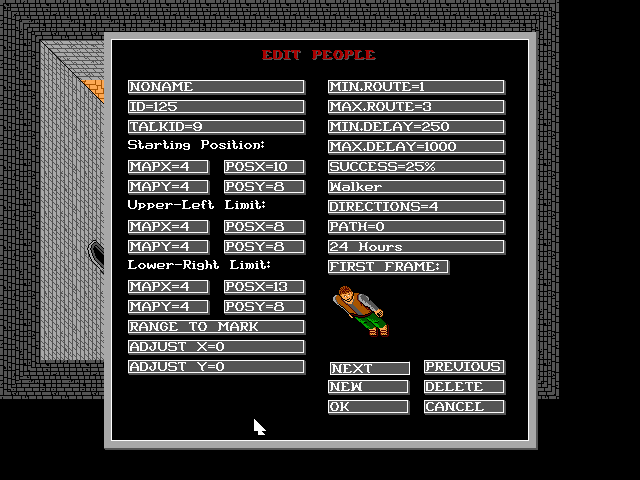
Editing a character in the Map Editor. Most of the options in the Edit People menu are for defining how the characters walks (i.e. how fast/far they walk or if they stand still). You can also assign a name to the character and define whether they only appear in the day, at night or both. What a character says is defined by the number in the "TALKID" button which will be explained further in the next two screen shots.
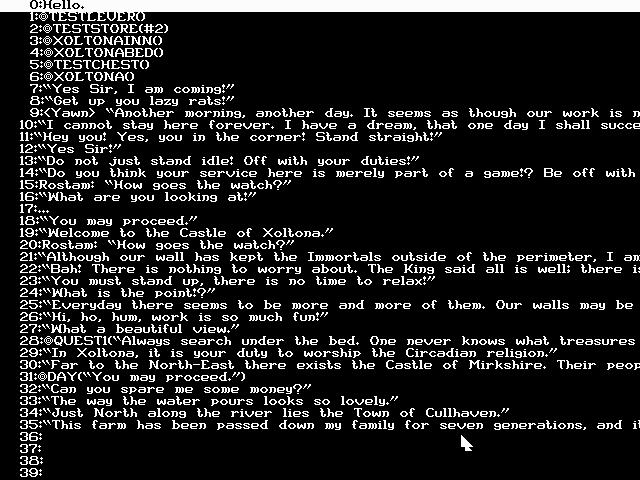
Browsing through the "Talk Editor" which is where you define what a character in the map says or does. The TALKID you assign to a character refers to the list in this menu. Not only can characters say things, they can also interact with you by using a script language I developed specifically for this game. To use a script command you type the @ symbol (which looks like two circles in the game's font) followed by the command.
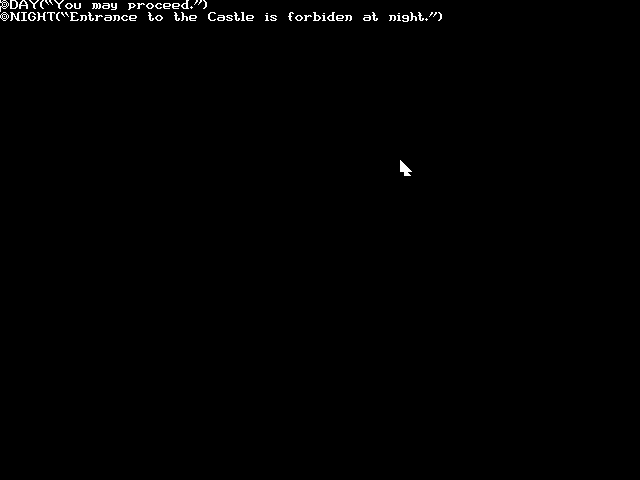
Editing a very simple script for a character using the Talk Editor. The @DAY(...) and @NIGHT(...) commands indicate the character should say "You may proceed" during the day, and say "Entrance to the Castle is forbidden at night" if it is night time. Script commands can be nested and used to create very sophisticated interactions, such as creating menus and trading gold and items with a store clerk, or going to an inn and buying a key for a room from an inn keeper. Objects also used scripts - for example opening a treasure chest executed the script language to tell you what you had found and give the item to you, or clicking on a bed asked you whether you wanted to sleep and then simulated sleeping if you clicked yes. This allowed game designers to easily add functionality to characters and objects while making maps.
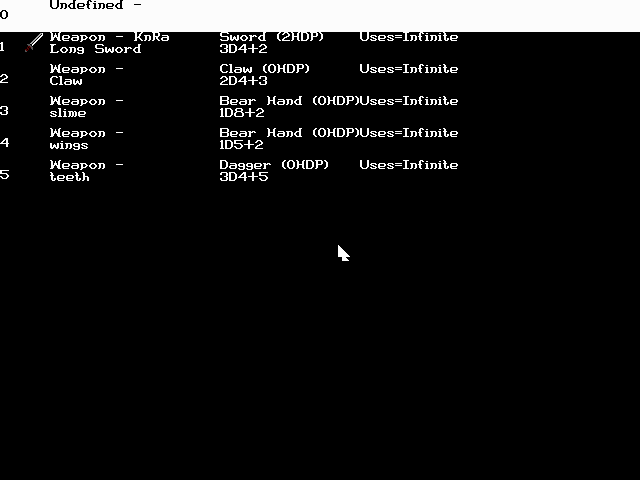
Browsing through weapons and items in the Item Editor, another component of the Map Editor. This is where you defined properties for each weapon or item in the game, whether it was used by your character or by enemies.
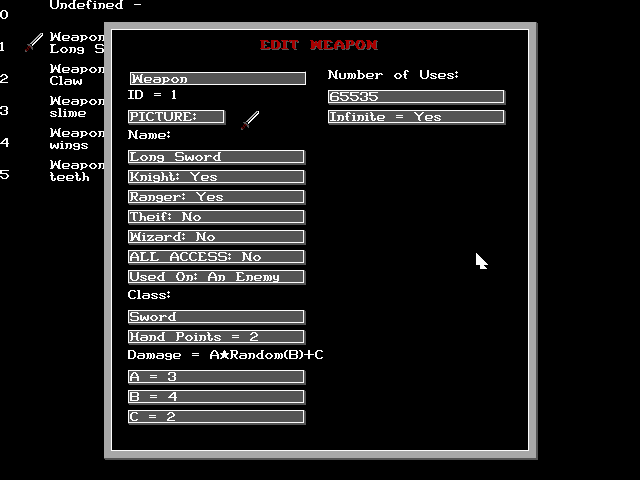
Editing a weapon in the Item Editor. Here you can define what a weapon looks like, who can use it, how many hands are needed to hold it, how much damage it does as well as other properties. Items defined in the Item Editor are recognized by the script language I developed for the game and can be used to interact with characters.
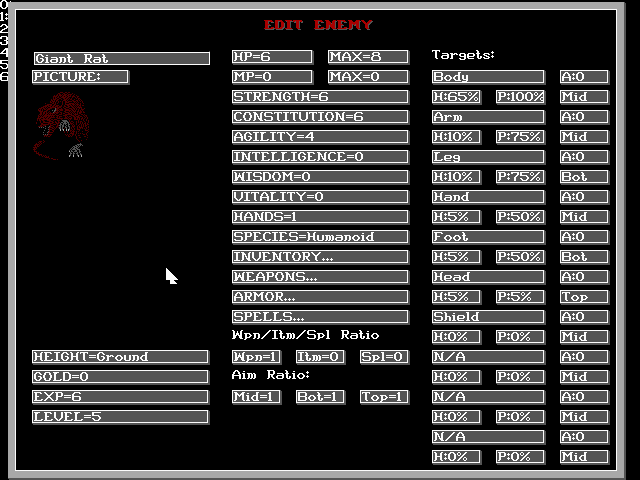
Editing an enemy in the Enemy Editor, which is another component of the Map Editor. Everything from hitpoints, gold, agility, strength or magic spells for the enemy can be edited here. Items defined in the Item Editor can be added as a weapon, spell or armour for an enemy.
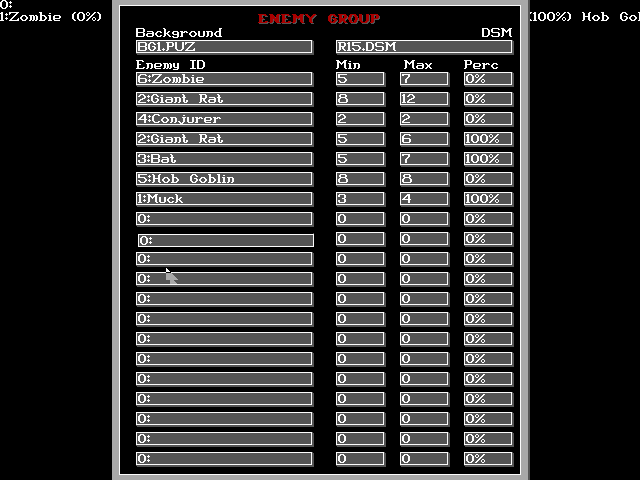
After creating individual enemies in the Enemy Editor you can also define how often they appear in the game, what groups they like to appear in, how many types of each enemy usually appear, as well as which background graphics and music to use for each battle.
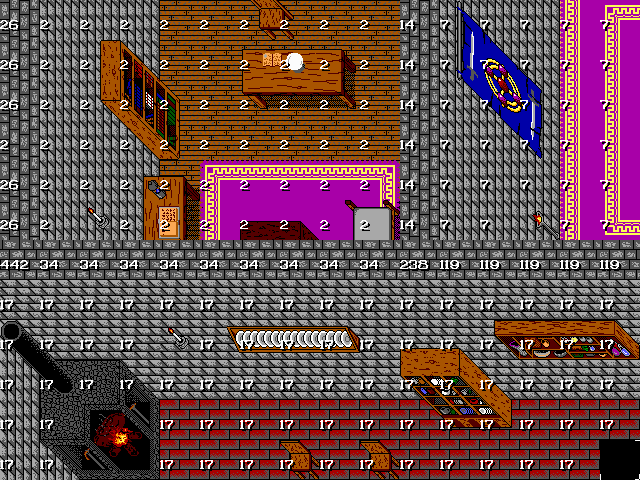
Viewing the Roof Codes for a map in the Map Editor. Roof Codes were a system of numbers I developed which defined which part of a map is visible while walking around. The way the system works is your character will only be able to see tiles which have a Roof Code that is divisable by the Roof Code of the tile they are currently walking on. For example, if you are walking under Roof Code 2, you will only be able to see the tiles that have Roof Codes 2, 26, 14, 34 or any other even number, but not odd numbers such as 7, 17 or 119. This makes it possible to walk into each room and only see the insides of the current room even though both rooms share the same walls.

Configuring a map in the Map Editor. Here you could configure properties such as the music, climate, day/night/sunrise/sunset length of a map. You can even edit the colour palette for a map (useful for making certain maps such as dungeons even darker than the normal palette).